Media & Techniques
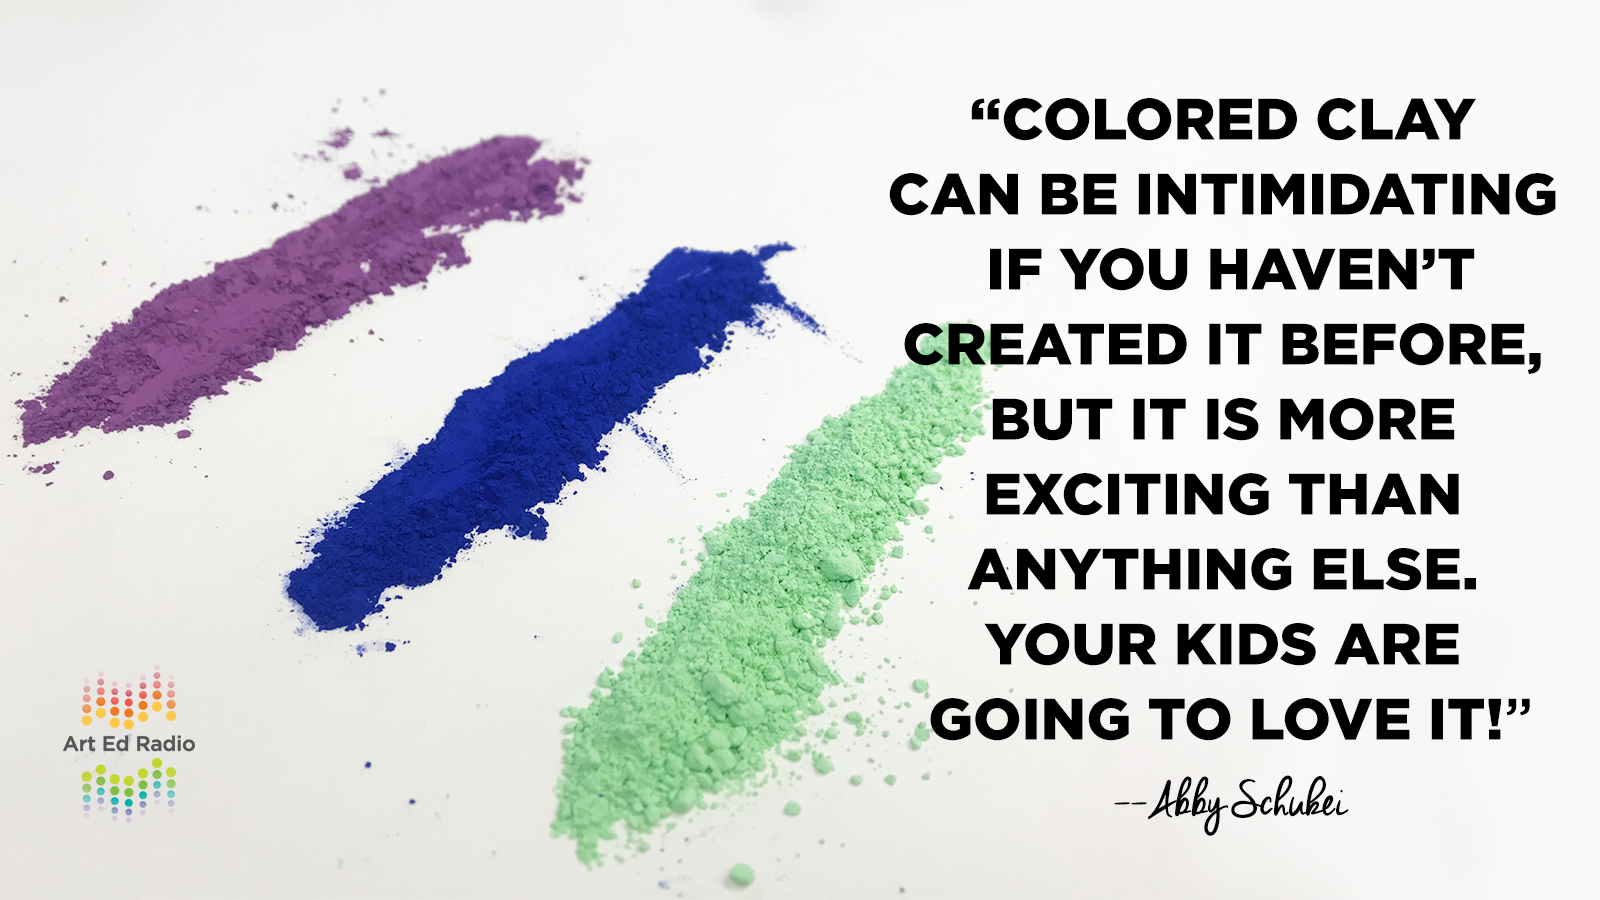
Why You Need to Start Using Colored Clay (Ep. 141)
If you are looking for a good way to add something to your ceramics teaching, you need to check out colored clay! In this episode, Abby Schukei invites Tim into her classroom to explore the idea of colored clay and how it can be used in your classroom. Listen as they discuss the process of creating colored clay, how much your students can do during the process, and some of the best lessons and ideas to bring more color into your ceramics. Full episode transcript below.
Resources and Links
- The Art of Dean McCrain
- Color in Clay Facebook Group
- AOE’s Studio: Ceramics Course
- Forest Ceramic Company (Instagram)
Transcript
Tim: Welcome to Art Ed Radio, the podcast for art teachers. This show is produced by The Art of Education, and I’m your host, Tim Bogatz.
All right. I am coming to you from Abby Schukei’s classroom today, and I originally came here for a different interview, but as I walked in, I notice that there is just colored clay everywhere I look, like everywhere I want to put anything down, everywhere I want to sit, some type of colored clay is there, and it looks great. Her kids are doing some awesome work. So, I was clearing some ceramics off the table to make a workspace, I started thinking about how it’s been a while since we’ve done an entire episode on a specific medium, or in this case a specific technique within a specific medium.
So I figured, why not? Let’s dedicate a podcast episode to all things colored clay. I want to chat about that. You know, I want to know from Abby how she creates the clay, how much her students are doing as part of the process, safety concerns that she has, you know, what this whole process looks like in her classroom, the projects her kids are creating, and just kind of whatever else comes to mind. I’m going to learn a lot about this for the first time here, so we’ll see how it goes. I think Abby is ready to chat now, ready to answer some questions and put my curiosity to rest, and hopefully, this conversation can be a little bit of a tutorial for people who might be interested in trying out colored clay and just giving the idea some space in their classroom. So, let’s bring her on and get everything started.
So Abby Schukei, I thank you for letting me invade your classroom. How are you?
Abby: I’m good. How are you doing?
Tim: I am doing really well, and I need to ask you, I don’t think I can take a step in here without running into colored clay somewhere, so the first question, important question, why are you so obsessed with colored clay?
Abby: Well, I just really love color, so that’s part of it, but I don’t know, a couple of years ago, I came across a Facebook group of all things, that was called like Coloring Clay, or Colored Ceramics, or something like that. I’ll find it and we can link to it. So I came across this artist who created these awesome … His name’s Dean McRaine. He created these just patterns in all of this clay, and I just saw an image of it, and I was like, “Holy smokes. How do you even do that?”
So I started following along with the process a little bit, trying to, and I was just always kind of like lurking in the background of this Facebook group, because I never did colored clay or anything like that, but I really wanted to try it. So finally, last winter, I was like, “You know what?” I was actually taking the AOE Studio Ceramics course, and as one of those things, you got to explore a lot on your own, so I was like, “You know what? This is the time that I’m going to try to do it,” and I just went for it, and it was awesome.
Tim: That’s really cool. That sounds good. Now, I want to ask you, I guess, as we’re kind of talking about this process, and we’re kind of giving people the audio tour of how it can be done, I need to ask, like, is this something that kids can do on their own, or is this something that you need to do behind the scenes after school someday, that you need to do for your kids?
Abby: No, definitely not. So, that was one of my concerns when I first started exploring it, and I was like, “How am I going to actually be able to do this with my students?” So, there are tons of different ways you can go about doing it. If you’re looking at artists … So, one of my other favorite artists that use colored clay and colored slips is … He’s Forest Ceramic Company is what he is on Instagram, his website, and that’s part of a collaboration with a couple of artists, but they use mixing slips, and do slipcasting that way, and I was like, “You know, I don’t know if that’s going to be something that my students can do,” but there’s a bunch of different processes that you can do with it.
So, I chose a way that students can totally do it individually on their own, and there are … Just like working with clay, and clay dust, and particles, there are some safety precautions that you have to keep in mind as you do it, but if you are doing those things correctly, students can totally handle it by themselves. I’ve tried it out with my eighth graders, and it’s something that they can 100% handle, and doing it once, I was just kind of … The first time I did it, I just was kind of testing the waters a little bit, and I found out that I can really do a lot more, and I shouldn’t be so skeptical of using the material, because it is kind of advanced and scary, but it totally works.
Tim: Yeah, and I mean, I think people are apprehensive just because it’s not something that you’ve usually done before, but you think it is simple enough to just kind of dive in and go for it, right?
Abby: Yeah. We actually use a little system where each student, we start with some slip, and each student puts in a little bit of mason stain, and that’s how you get the colored of the clay. Now, you do have to be careful when you’re mixing the mason stains in, because that is the part that has the chemicals, and the silica, and things like that, that you don’t want to breathe in, and students are really only handling that dry material for like a minute, max. So whenever I have students measuring and putting mason stains inside of their slip, to make their clay body, they’re always wearing a respirator mask, just to make sure that they’re not breathing anything in, but as I said, that part is … Like, if it takes more than five minutes, that step, that means a student isn’t doing something quite right. So other than that, it can really be done with safety precautions.
Tim: Okay, cool. And yeah, I want to talk a little bit more about that later, but can you kind of explain to people what mason stain is, where you order it or where you get it, and I guess if there’s, just for your preference, like a particular clay body that works best for you?
Abby: Yeah. So you can order mason stains from any ceramic company. You typically can’t find it on just like ordering on Blick, or Sax, or anything like that, but if you’re going to any ceramic-based company, they’re going to have it there. So if you were to use oxides and other colorants naturally, and chemicals to naturally make colors in clay, you can totally do that, but that process of grounding chemicals and all of that is just so labor-intensive that that’s totally not something that I’m going to do in my classroom. So virtually, all of these mason stains are pigments, and colorant, and chemicals all mixed up together, ground together, and it comes in a very powder-like substance, and it is very vivid in color.
So, as you go and use that, it’s super simple, but the best way that I find to use it, it works best with a lighter clay body. It is ideal to work with porcelain, which you’ll see a lot of artists doing, but I don’t … I mean, I teach seventh and eighth grade. We don’t use porcelain in my classroom.
Tim: Right, and most people can’t afford porcelain for their classroom.
Abby: No, so I actually just use … And I was a little scared when I first did this, but I actually just used … I just use a white clay body, low fire clay, because that’s what we primarily use in my classroom, so it works really fine for that, and it doesn’t … When you mix it in, and when a light, white clay body is wet, it looks kind of gray until it’s fired, so you can be a little misled as to what the color’s going to look like, but if you make test tiles and do test firings, you’ll be able to see what the color’s going to turn out like.
Tim: Okay, cool. Now, I want to ask you a little more specifically too, about putting this all together. You know, after you have materials, you’re talking about kids measuring and putting that together, but can you just kind of talk us through the whole process, like the beginning … If somebody hasn’t done this before, how would you explain to them how to add this color to their clay?
Abby: So, as I was starting to describe earlier, I start with just a little bit of slip in a Ziploc bag, so this is how I do it individually for students. Virtually, I’m having students in this process create their own mini-colored clay block, just for them. So, I take a Ziploc bag, and I am going to fill it with slip. You could also just fill it with water, a little bit of water. You just need to have some type of liquid or moisture to mix those stains up with. So then, there’s really no science to the measurement that you put into it. It’s just really going to be the darker you want your clay body to be, or the brighter you want it to be, the more mason stain that you’re going to add. So we just kind of do that by look. You can totally measure out. It is recommended that you use like 10% mason stain too-
Tim: Yeah, I’ve heard like 10% is the baseline, but you can go up to like 15 or 18% if you really want-
Abby: Right, and sometimes, you put that 10% in, so if you’re measuring 100 grams, you know, 10 grams, that’s not a lot, so it’s not as bright as you want it to be, so I just … You know, you can’t really go wrong with more color. Like, you’re making colored clay because you want it to be colorful. Now, if you do get too much, there can be some problems with like firing temperatures and things like that, but that’s a lot of mason stain, probably, that you would never run into unless you’re mass-producing something.
So, you get the mason stain so that it’s kind of like a glue-like or paste-like substance, and then all I do is I have students take bone-dry clay, and this is the key, so broken up, bone-dry clay pieces. You know, it could be left over from things. As long as it’s the same clay body, it doesn’t matter. And then we just stick that bone-dry clay into the bag. Then what that does is, just like you would put that in water, it’s going to break it down but like fine particles. Doesn’t do the same thing if the clay is wet already.
And then you can let that sit overnight, maybe, and then as you go in, have students check it. If it’s too dry, if it’s too watery, or you make sure if the clay’s way too plastic, then you’re going to either just add some more water to it or you’re going to add in another piece of bone-dry clay.
So then eventually, you know that it’s the right consistency when you can wedge the clay together, and you start by doing it in the bag, just because it keeps it cleaner, but once you can wedge the clay together, and it’s in a plastic, workable stage, that’s kind of the quick process. I mean, it’s just kind of a lot of waiting. But yeah, one of the things, too, just to make sure when you’re mixing it, is just simply you want to make sure that it’s thoroughly mixed and not all the marbled effect, which sometimes you will want that, but there are some better ways to do that, is just simply cut the clay block in half, to see that the color is mixed thoroughly through.
Tim: Okay, that sounds really good, and I actually want to talk about kind of what you do with the clay, but before we get there, like before we get to projects, I want to go back to the idea of the safety concerns, and you know, you didn’t seem to be super concerned about it. You talked about masks for the minimum time when kids are going to be working with dust and all that, but you know, how do you address that with your kids? Like, how do you talk to them about safety concerns, what your expectations are, and what they need to do to kind of keep themselves safe throughout this process?
Abby: Basically, I just scare them, and I’m like, “Listen, you don’t want to breathe this stuff in, because it’s so bad. It gets into your lungs, it can never come out,” and you know, I go a little crazy with it, but it seems to work. But really, it’s just one of those things, just like … You know, and I’ve been a lot more conscious with it, even when I’m just working with clay myself, when, “Oh, I just got to do this real quick. You know, I’m not going to put a mask on or whatever,” and it’s like, you know, even if you’re just doing it 10 seconds, you know? So I try to lead with an example with that.
I’ll also have my students, as well as wearing masks … And those are so inexpensive that you can get, and if you’re getting even some more high-quality ones, you can get replacement filters on them that students can use, but I’ll also have students wear gloves, too, just to make sure that nothing else is problematic. But like I said, the whole … If you just kind of scare them a little bit with why … Like, tell them why, you know? Because you might not … Typically, unless you’re working with dry clay, you might not have students wearing masks in the classroom. So just really explain why you’re having them do that, and then they’re usually just scared, so they’re like, “Okay, I’m just going to listen to her because I don’t want to ruin my lungs already.”
Tim: Right. No, and I’ve found if you just give kids reasons behind why you’re doing what you’re doing, they’re usually a lot more receptive to that. But moving away from the scary and more into the fun sort of thing, can you talk about what you’re doing with this clay once it’s all mixed up? Like, what kind of projects are you doing? Does it work best for wheel throwing, for slab construction? Like, what are you creating? What do you do after it’s fired?
Abby: So, the glory of the colored clay is that you can literally use it the same way as you would just clay straight from the bag. It just adds a little bit of element of surprise to it. So yes, I love using it for wheel throwing. That’s a really fun way to do it. Maybe you take like half of a colored piece of clay and wedge it together with a non-colored piece of clay because then you’ll get a cool, marbled effect, but I’ve really enjoyed working with it slab construction because students can put different colors together. So sometimes, they might make a little bit of a green, a little bit of a blue one, and then actually just combine those together to make a design in a slab, or into a new block of clay. And sometimes, you’ll have students that will mix different colors and they’ll switch with others, which is fun.
So, we talk about just very basic, simple ways that you can add slabs and just add a new clay block together out of all … build a new clay block together out of all of these little different parts of colored clay. That comes together, and then the design itself then comes from the clay block that you build. So you don’t have to worry about adding extra glazes and things like that, which can get really expensive. So, depending on how much mason stain you’re ordering, it can seem like it’s pretty pricey, but in the other way, on the other end of the spectrum there, you’re not typically going to be ordering as many glazes, except for clear glazes, which makes the colors look wild, and awesome, and amazing, so you have to use clear glaze. But there are some cool effects that you can get with just regular colored glazes too, but that’s kind of the fun part about it, if you don’t have to worry about that, which is just … Students are just super drawn to that element of surprise and what’s going to happen after they’ve created with their colored clay block.
Tim: Yeah, that’s really cool. Makes me kind of want to go try it. So just one last thing before we wrap up. Any words of encouragement, words of advice for people who are thinking about diving into colored clay?
Abby: I would just say go for it. I mean, if I can do it, you can totally do it, so just don’t be apprehensive to try it out. Your students will love it. Just make sure to go through these … You know, just walk them through the process. And one of the other things, when you’re first doing it, I don’t have … One of the things I should mention is when I … Describing this bag technique, I’m only having two or three students back at a time working in it, so it’s not like a mad cluster of students, so just work small, work together, and it’ll be great.
Tim: Awesome. That sounds good. Well, Abby, thank you so much for sharing this. We’ll put all of the links together so people have an idea. We have an article coming that kind of explains the process as well, so we’ll put all that together so people have the resources they need to get started, but thank you.
Big thank you to Abby for letting me come into her room and check things out, and a big thank you to her for sharing all of her ideas, you know? Some of the details about how she does things, you know? Very specific about mason stain, and techniques, and how she puts everything together. And I appreciate that you know? And just giving all of those tips about how to make it work in your classroom. So, I hope that you can take some things away from this episode. I hope that this gives you some inspiration to maybe try this out in your classroom.
And as Abby said, she was a part of AOE’s Studio Ceramics course, and it was just a great chance for her to try these ideas out, you know? Kind of the impetus for her to discover how to work with colored clay and make it happen in her classroom. And honestly, there is nothing better than AOE’s Studio Ceramics course. It is one that I love to teach, one that everyone loves to take and be a part of. Like all AOE Studio courses, it is worth three credits, runs for eight weeks, and gives you both hands-on techniques and instructional strategies, so you can do everything that you need, everything that you learn from this class can transfer into your own class, with your own students. So, if that interests you, make sure you check it out at theartofed.com/courses. All right, that will be it for us today. Thank you for joining us, and now is your chance to go get started on some colored clay.
Art Ed Radio is produced by The Art of Education with audio engineering from Michael Crocker. Personally, I am about a week and a half from running my second marathon, so next week’s episode is going to be all about running, but with an artistic twist. I think you’ll enjoy it. So thanks for listening, and we will talk to you next Tuesday.
Magazine articles and podcasts are opinions of professional education contributors and do not necessarily represent the position of the Art of Education University (AOEU) or its academic offerings. Contributors use terms in the way they are most often talked about in the scope of their educational experiences.