Related

Classroom Management
 Podcast
Cassie shares her own stories about moving into her new art room, and gives some tips as to how you can look at your old art room with new eyes and a fresh start. Listen as she discusses how to assess your art room (5:00), why you need quality supplies (7:45), and why organization and flow are far more important than decoration (12:00). Full episode transcript below.
The phone rings. You answer it, and you hear the words you’ve been dying to hear every since the interview. “Congratulations. You’re hired.” How exciting. I’m thrilled for you, especially if you listen to podcast number 42 and took some of my advice. I do believe I’m kind of responsible for you getting hired. You’re welcome. Now that you’re hired though, suddenly, the panic starts to set in because you realize, “Oh, my goodness. Not only am I responsible for the art education of lots of children at my school, if not all of them, I also have an entire art room to revamp, to make my own, to assess the damage that could very well have been left behind.
Today, we’re going to talk about it. I’m going to share with you my top five things that you need to know if you are entering your brand new art room. Congratulations. You’re hired. Now, let’s tackle this art making space. I’m Cassie Stephens, and this is Everyday Art Room.
Funny story. My good friend, Debbi, who taught art for, I want to say, 30 years, you all, she’s now since retired and living the life. She was sharing with me, not too long ago, a story about how when she got hired at a school in Memphis, the previous art teacher left not quite thrilled about having to leave. In fact, she was so un-thrilled that she decided to empty out all of the boxes of clay. I’m talking hundreds of pounds of clay, and put in the middle of the art room floor one giant Mount Clay Everest for the following art teacher, which was my friend, Debbi, to take care of and clean up. Can you even imagine? I know that you guys probably have horror stories, as well, of walking into your brand new art room and it not giving you that brand new, happy, shiny feeling.
I know I’ve shared with you lots of times, at my first year teaching, I was in a portable, and the previous art teacher had only been there a year, and I could tell it had been a struggle for her. My room was a disaster. It was a trailer, so it was very small. I had one closet where, because it was a portable, the closet was literally the size of a closet in maybe your guest bedroom at your home. It was a door with a couple of shelves. Inside that closet, I remember opening it, and things just falling out, random board games with missing pieces, coffee cans filled with broken crayons, and just random piles of construction paper, a hot mess, and that was it. That was all of my supplies.
Fast forward several years later, when I decided to switch schools, and the art room, my buddy, Margo, whose art room that I took over as she retired, was the most pristine, magical place you could ever imagine. Not a thing was out of place. This was easily the cleanest art room I had ever seen. I really wish that I would have taken pictures of it because I have since been in that space for close to 15 years, and, you all, it is now, currently, a flaming hot dumpster fire, but all that to say that if you’re hired, are going to be, hopefully, walking into an art room of your very own, and you’re going to feel probably overwhelmed. I know I was, and not even having a clue as to where to start. Even me, walking into that super tidy art room, when I was given the keys and it was officially my space to share with my students, I had not a clue as to where to begin.
This summer, I’m decluttering. I am emptying out everything, and I am kind of trying to start afresh in the organizational realm, and I’ve learned quite a few things, and I’m thinking about it as if this was a brand new art room for me, because I need to consider what I would get rid of and how I would rearrange things and set it up.
That’s kind of how I’ve come up with this list to share with you all. If you’re walking into your brand new art room, or even if it’s not a new art room, even if you’re like me and you just want to just clean things out and really start afresh come the next school year, have I got a list for you?
Starting at the top, thing number one is assess your supplies. What I mean by that is is if this room is new to you or even if it’s not, start by pulling everything out of your drawers, out of your cabinets, and out of closets. When you do so, do it … I like to do it one area at a time. If I’m thinking of my art space, my art room, my art room, which used to be the school library, so it’s got a bunch of cabinets and drawers and things that used to help, I guess, the librarian when she was there. It helps me to start by just pulling things out one cabinet at a time, and then laying it all out in a way where I can visually see and understand it, meaning I put my classroom tables really close to my cabinets so I can take things out of the cabinet, turn around, set it on the table. Once everything is out, I like to start grouping supplies. I have this really bad habit, when I put things away, of just opening a random cabinet and throwing something inside. If I start grouping all of my oil pastels together, putting all of my markers on one table, putting all of my Sharpie markers on a different space, then it really allows me to just visually take a moment to assess the supplies that I have.
Once you’ve done that, then you can move on to the next step, which is to go find out your budget. Before you start assessing your … After you’ve assessed your supplies, but before you start generating that supply list, if you’re new to the school, you might not want to start creating a supply list without knowing just how much money you have in your budget. Go to your bookkeeper, find out what the previous art teacher had allotted as their budget. Hopefully, they had a budget. Also, find out if there were ways for you to acquire other monies, if that’s something that your school allows you to do, i.e., fundraisers, or even, if you’re going to get money when the school does school-wide fundraisers. Our school does a cookie dough fundraiser. I always get a small portion of that for the art room. It’s good to know how much money that you have before you start thinking about how you’re going to spend it.
In episode, gosh, I think it was episode 38, I had an entire episode of things that are always on my supply order. As you find out your budget, it’s nice to dream big, but you also have to keep it real. Think about the supplies that you must have to really get the ball rolling the first couple of months in your art room. Also, it’s a good idea to think quality supplies over quantity. That’s a big mistake that I made a lot my first several years teaching. I would always take shortcuts ordering the cheaper paint, ordering the less expensive markers, ordering the thinner paper. Bad idea, because, then, what you’re left with, I remember, one year, this paint I ordered, it literally, when it dried, would chip off the kids’ paintings. They had huge chunks of their painting that would just chip and fall off the paper. Also, the paper that I was using was just getting all wrinkly. I was constantly having to iron it. It’s always good to buy the best quality of supplies that you can afford, knowing that you’re giving kids supplies that they’re going to be able to create beautiful works of art with and be inspired by, and, then, as years go on, you can start to acquire more and more of the expensive supplies.
Like I said, if you are very curious as to what supplies to order, revisit episode 38 where I talk all about my favorite art supplies.
Once you’ve got an assessment of your supplies and you know your budget and you’ve generated your list, then you can start considering how you want to rearrange your space of your art room. Before just starting to chuck things back in the cabinet, what I like to do is start to think about how my students are going to move around my art room. How will they enter? How will they go to their seats? Are they going to get their own supplies? Is somebody going to be in charge of collecting supplies for the table? How do you want those supplies to be accessible? What supplies do you want accessible for your students? What supplies do they not use very often so you can keep tucked away in your cabinets?
For me, I like to keep on their tables a small caddy that’s color-coded. I’m big into color-coding everything. It really helps my students visually understand what supplies to gather and where they are to go to create. On their table, I have a small Dollar Tree caddy that I’ve spray painted color-coded-wise, and I only keep on their tables pencils, scissors, and erasers. Those are the things that we basically use every single art class. As far as things, like glue, markers, oil pastels, crayons, the other basics that you know your students are going to use pretty frequently, but maybe not daily, I personally keep those on a cart in between my tables, and those carts are also color-coded. That way, if there’s anything that the students are going to need, I have one person who’s responsible for getting those things off the cart and returning them to the cart because they might be necessary for that particular class, but the following class might not be using glue. They might not be using markers. If those things are left on the tables, my students might accidentally use the wrong art supply for whatever project they’re working on.
Those are things that you need to consider before you just start arranging your tables. I know when I first started teaching, without a clue, I just set up my tables how I had noticed the classroom teachers did, and I put all of the supplies on the tables because I just didn’t know. Really stop and give some thought as to how you want your routines to flow in your art room. I did a podcast, my very first podcast, episode one is all about routines. Really something you need to consider before you start just randomly arranging your tables and your chairs in your art room. Once you’ve got it figured out, go for it.
That also brings me to supply organization. After you’ve figured out where you want your students to travel in the art room and move around, then you can start to think about, what supplies do I want to have them constantly have on hand on the tables, occasionally on hand perhaps on a cart or off to the side or in a location where they can access them easily, or supplies that only you are going to be putting on tables and getting out for them, such as tempera paints, tempera cakes, clay, that kind of thing. Those kind of supplies, I put away so it’s out of the way of the students or me until it’s ready for me to pull them out and use them.
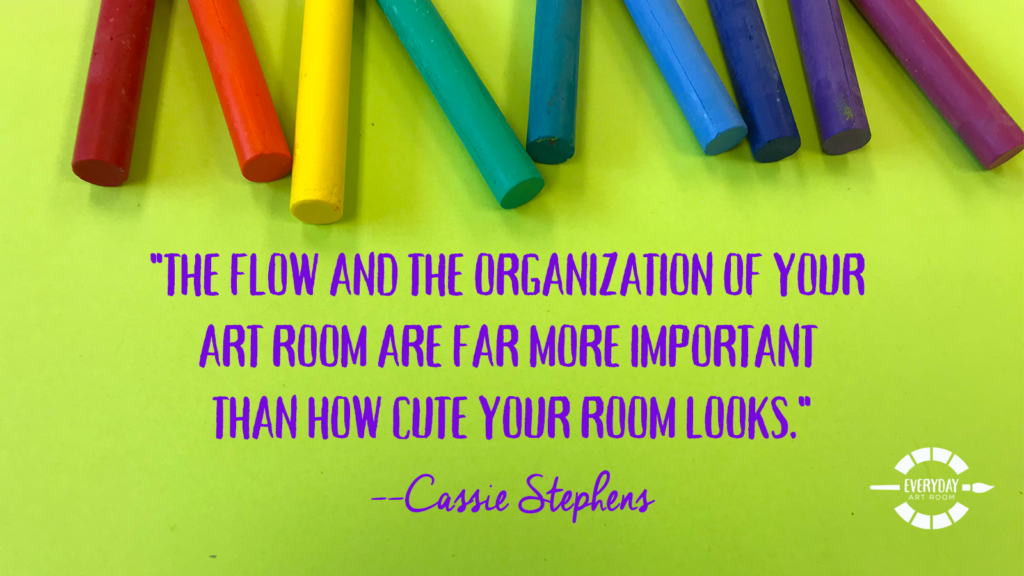
Alright. After you’ve got that kind of thing done, the next thing, which is my favorite, is to start to think about how you want to decorate the room. I feel like, if you’re like me, that’s the first thing you start dreaming about and imagining, and you want to dive right in, but I promise you, you’ll want to do the other things first because they are much more important. The flow, the organization of your room is way more key to having a successful year than how cutesie your room looks, and this coming from a gal who lives to cutesify her art room. Don’t do as I do. Just do as I say. Trust me. I wish that I listened to my own advice. I never do. What’s up with that?
The first thing you’ll want to do before you start decorating your room is to come up with a visual behavior plan. What that means is your rules. In episode two, I talked a lot about the different rules that I’ve had over the years in my art room, and one thing I’ve learned is the best thing to do is to keep your rules very simple. Currently, my rules go along with the word art. A is for aim to do your best. R is for respect yourself, your classmates, and supplies. T is for trust in yourself and your ability to learn. Again, you can find out more about my rules on episode two. I’ve also done several blog posts about that set of rules and how I created painting visual for my students.
Not only do you want to have your rules up permanently on display and very visible for your students, it also helps to have your consequences. Make them clear. Make them concise. In my room, my consequences, they’re very simple. They’re clear. My first one is a warning with a reminder of the rule that was broken. My second one is for my students to take essentially a time-out, which is a think about it time, separate from the group, just a little break so that they aren’t distracting my students who are learning and also so they’re just taking a little time off on their own to think about what they’re doing, and then the last one, which is something that I think I’ve done it once this year, which is an office referral. That is the kind of thing that needs to happen very, very rarely, if possible, in your art room.
Having that visual plan is great for you to reference to your students when they break a rule. It’s great for your students. It’s also awesome for your administration to when they walk in to see that, yes, you have a classroom management plan in place and that it’s clear and concise for your students.
Alright. Then last, but not least, is art room décor. Your art room, your brand new art room, is like a big, blank canvas. What are you going to do with this space? Are you going to go with a theme? If so, is it a theme that you’re going to want to change every year or one that you’re going to want to keep in place for a long time? I used to spend my summers coming up with an entire cultural theme, completely top to bottom revamping my teaching space to go with that team. It was a lot of work. For that reason, I no longer spend my summers that way. Now, my theme is currently just to make my space as bright, colorful, inspiring, and happy as possible while leaving some blank areas for visuals of whatever culture or artist or art movement that we’re covering in the art room.
If you’re thinking about how you want to decorate your room, think about, do you want to make this a space where it’s a constant or a permanent kind of display, like what I have now, or do you think you’re going to want to change it up every year? Also, just think mostly about what kind of reference visuals are you going to want on hand because I feel like that’s the place to start when it comes to decorating, and what I mean by that is this. What are you always going to be talking about as an art teacher? For me, that means I’m usually talking about the color wheel. I reference the color wheel all the time, so I painted my gong to look like a color wheel. It’s big, and it’s a great visual for my students. I also painted some wooden oars from Michael’s craft store to look like giant paintbrushes, and I have those hung and arranged like a color wheel so I can reference that, as well.
Also, another thing that I always find that I’m referencing in my art room is rainbow order, ROYGBV, so I have another giant display of rainbow order, ROYGBV, paintbrushes in my art room. By the way, you can find a visual of these on my blog if you just search. I think I had a recent post called Before and After Art Rooms. You can see how my art room has transformed over the 15 years that I’ve been in that space.
Something else I always reference in my art room are the names of lines, zigzag, vertical, diagonal, horizontal, wavy, curvy, loopty loop, and I have another display of those in my room.
Think about, in your lessons, what are you going to constantly be referring to, talking about, the elements of art, that kind of thing, because that will also give you a starting point to how you want to decorate your room.
My most important advice is to keep your room clean, colorful, and clutter-free because, once the school year starts going, it is going to be anything but clean and clutter-free, unless you’re better than me, which wouldn’t take much, and better at maintaining a clutter-free and clean kind of area, but, once the kids are in there creating mountains of beautiful masterpieces, it’s going to be pretty tricky to keep all of that clean and clutter-free, so you might as well start with a room that is clean, colorful, and clutter-free to kick the year off right.
Whew, I want to know all about how you’re going to decorate your room. I’d love to see pictures, so feel free to send them my way or share in the comments. By the way, if you ever want to send photos my way, you can, of course, send them to everydayartroom@theartofed.com. Thanks, you all, for letting me share how to start your school year right, especially if you’re hired and you’re in a brand new space.
Tim Bogatz: Hello. This is Tim Bogatz, the host of Art Ed Radio. Thank you for tuning in to Everyday Art Room. If you’re looking for graduate credits in the next few months, make sure you check out theartofed.com under the Courses tab. We offer over 20 online courses, designed to help art teachers at every stage of their professional career. Whether you’re looking to develop a new art curriculum, get help with classroom fundamentals, incorporate new technology into the classroom, or just brush up on your own art making skills, we’ve got the course for you. Our online graduate courses are practical, relevant, and highly engaging. They’re also fully accredited, and perfect for re-licensure, logging hours, or earning credits toward your Master’s degree. Again, you can check out everything related to these courses at theartofed.com/courses. Now let’s turn it back over to Cassie as she finishes the show.
Now it’s time to take a little dip into the mail bag. This first question comes from Dena, and she has actually a question about a blog post that I recently shared. She says this. “I have many questions, but I’ll start with one. On your last day of school project, you mentioned you used a bingo dobber to outline your banner. I have a bunch, but never thought to use them other than making dot art. You used an actual black bingo dobber to draw all of those pictures? Please elaborate and explain.”
If you’re not sure what Dena is asking about, I recently shared on my blog that for our Field Day, for the art station portion of the Field Day, I rolled out an 18-foot piece of bulletin board paper, and I created essentially a giant coloring sheet that, instead of coloring, my students painted in, and that was the art portion of our Field Day, and I had not planned on doing this, but because they were calling for rain showers that day, I got to school around 6:30 because I was freaking out because all my plans for my Field Day were scrapped, due to rain. Of course, it never did rain. Isn’t that how it always goes?
I rolled out this sheet of paper, and it took me about 40 minutes. I gave myself very little time, to just basically draw out things on this paper, pencils, crayons, scissors, words like think, grow, kind, and then just had it ready, so my students could paint it in. I love using the bingo dobber for making posters like this. Essentially, what a bingo dobber is is it’s a little plastic bottle with a fuzzy-tipped top, and you can remove the top with a pair of pliers, and I fill it with diluted India ink. I’ve also used diluted tempera paint in a pinch when I didn’t have India ink on hand. I don’t like it as much because it doesn’t come out of the bingo dobber as easily.
The reason I love drawing with it is because it’s like drawing with a really large marker that never seems to run out of ink, creates a beautiful, thick line, and if you use the ink, then it’s permanent, and as the students are painting, the black does not start blending with the colors they’re painting with.
Also, I’ve noticed that the India ink tends to dry super fast, so I drew it all out, and then I think it was 30 minutes later, the kids were ready to come to my station, it was already dry. They finished painting that thing so fast that, by noon, I had to make another 18-foot banner because I knew that my afternoon Field Day station kids would want to do the same, and that, again, took me about 40 minutes to draw it out.
Yeah, Dena, that’s what I used. My kids love the bingo dobbers. I love them, use them for everything.
This next question comes from Lisa. Lisa says, “I have an interview on Wednesday and wondered if you might be able to offer some advice.” Lisa, I did a whole podcast on interviews, but I will take your question anyway. “Also, would it be inappropriate to wear a skirt?” She’s asking, “Would it be inappropriate to wear a skirt that I’ve painted a Starry Night version on, or should I dress a bit dullish?”
Well, let’s see. I think the skirt sounds fabulous. I know in the podcast, when I talked about interviews, I really, really stressed that I believe you should dress very professionally, simply because the people who are interviewing you are not art teachers, so they might not necessarily appreciate your wild and wacky wardrobe. I know that some administration that I’ve worked under before, they were strictly suit-wearing types, and others that I’ve interviewed with, they’ve been a lot more casual. It’s hard to know, but I like to go on the side of dressing more professional. If your skirt goes to your knees or longer and you can wear it with tights and close-toed shoes, then go for it. However, even if you’re slightly questioning this skirt or you’re on the fence about it, I think you know your answer already. You could always take a picture in of yourself wearing some of your more fun and funky clothes. You could dress professionally for the interview, bring in photos of what you’ve created to teach in, and I think that might help you share that you’re willing to be a little bit silly, but you also know when to be professional.
I don’t know. My advice is to always be a little bit more professional-looking for interviews, and then save the wackiness for when you get the gig. That’s kind of what I did.
Thanks so much for the awesome questions. If you have a question for me, you should totally send them my way. You can find me at everydayartroom@theartofed.com.
If you follow me on social media, then you know I am in the process, and it’s been a year-long process. My specials team gives me the hardest time about this. I’m in the process of decluttering. Yes, I have been decluttering for months. Yes, it’s like, for me, eating an elephant one bite at a time, and it just so happens that my elephant is a mammoth. What do you know, but all that to say is one of the reasons I’m decluttering so much is because I just have this vision that the day that I retire, which is probably going to be a very long time away, that the poor soul who has to take over my art room is going to let the cat out of the bag that Cassie Stephens was the biggest hoarder, hot mess person, art teacher type she has ever seen, and look at what I have to deal with. You all, I don’t want to have to do that to anybody, so I’m starting now, chipping away, cleaning out my space, and making it into the first day art room, as if I had just gotten this gig, cleaning everything out, and assessing the damage, so to speak.
Thank you so much for letting me share that process with you. Hopefully, it’ll help you, whether or not you’re entering a brand new art room or you’re simply like me, you’ve been in a space for a while, and you need to assess the situation. Have a great week, guys.
Magazine articles and podcasts are opinions of professional education contributors and do not necessarily represent the position of the Art of Education University (AOEU) or its academic offerings. Contributors use terms in the way they are most often talked about in the scope of their educational experiences.