
Color theory is one of those concepts that can be taught various ways. Because it often involves hands-on exploration and discovery, students become engrossed and engaged in the process. But I know by the time my students have come to me they’ve created a color wheel in almost every other art class. Although the color wheel is certainly a powerful tool, there are so many other ways students can learn about color theory and mixing.
Today I am going to share a cool way for you to teach color mixing that involves a little paint and a little technology.
1. Gather Your Materials
For this activity, you will need the following:
- Fluid acrylic paint (can be watered down)
- Clear plastic cups or jars
- Eye droppers
- Large white piece of paper
- Water
- A device with a camera feature
2. Create Paint Stations
To complete this activity, it is important to use fluid, watered-down paint. Acrylic paint will work best. The most economical way to do this is to add some water to those almost-empty bottles of paint you have laying around and give them a good shake. However, liquid acrylics like these will also work well.
To keep things organized, create a paint station students can access. Put each color in a separate container with a corresponding eye dropper.
3. Group Students and Have them Gather Materials
This activity is best done in groups of two to three students. Have the groups spread out around the room. To begin, each group will need two clear cups filled with water set on top of a large white piece of paper. Once they have this set up, invite them to the paint station to choose a few colors of paint.
4. Capture the Magic!
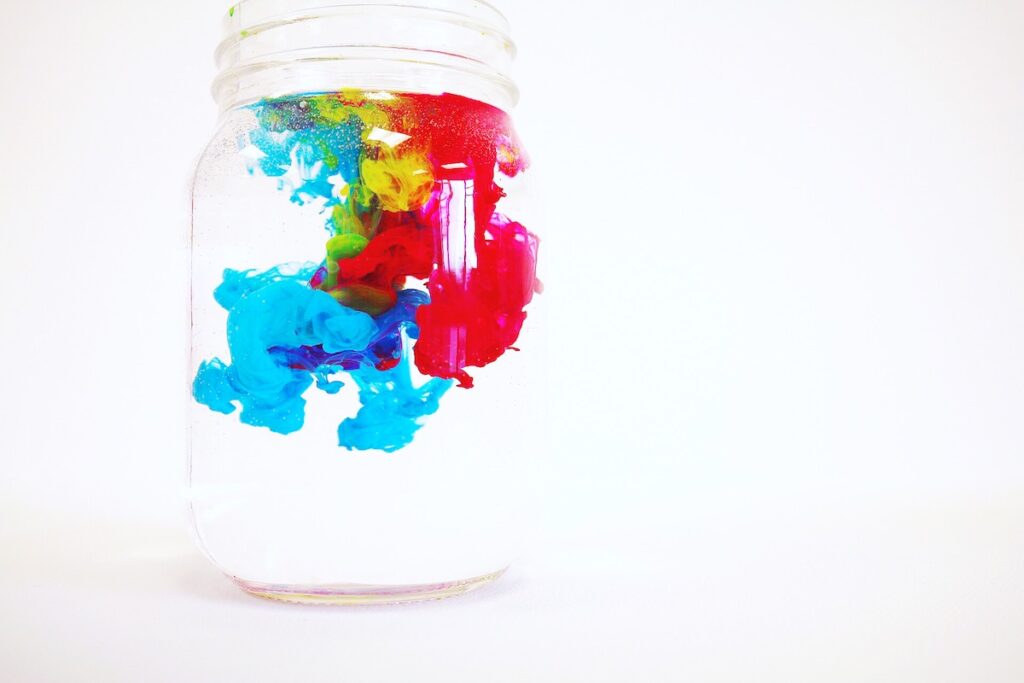
Once students are all set up, they are ready to capture some magical color mixing! A device that can capture macro images is ideal, however, few of us have access to those types of cameras. But don’t fear! A smartphone or tablet will do the trick!
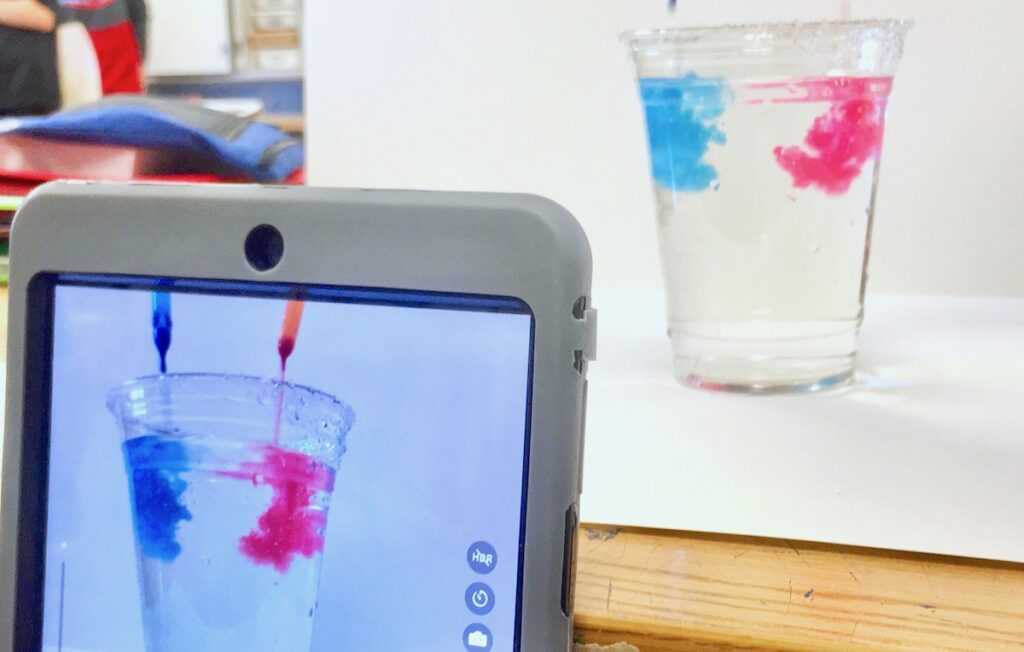
Encourage students to drop two to three colors at a time into a clear jar of water. One or two students working with the paint and one student capturing the photos generally works well. To encourage student discovery, have them write down the results in their sketchbooks. Sometimes the initial burst of colors looks beautiful, but the beauty fades once the colors settle down at the bottom of the cup. This activity helps students see which colors might work well together when working on a painting project.
5. Take the Activity Further
This activity can certainly be used as a stand alone activity. However, there are many ways your students can use their photos. For starters, exploring photo editing and photo manipulation with the originals leads to some awesome results.

Programs like Photoshop, Lightroom, Pixlr, or Gimp are all good options. You might even have your students explore some digital editing apps. In this way, students can transform their photos into entirely new images!
No matter how you choose to teach color mixing, the important thing is that you are giving your students a chance to explore something new. Who knows, this may be motivational for your most reluctant learners! If it’s been a while since you’ve tried teaching color mixing in a different way, this is the perfect activity for you. Your students will ask when they can do it again!
What is your favorite color mixing activity?
What do you think, should students have to create a color wheel every year?
Magazine articles and podcasts are opinions of professional education contributors and do not necessarily represent the position of the Art of Education University (AOEU) or its academic offerings. Contributors use terms in the way they are most often talked about in the scope of their educational experiences.


