More and more teachers, art departments, and districts, are either willingly or grudgingly adopting technology in the art room. Whether you’re a techie or a technophobe, teaching a new, tech-centric class can be a little daunting. Digital arts brings with it some specific pros and cons.
The pro in teaching digital arts is the technology itself. It is the native language of most students and is where so many of them spend their time. The con is… also the technology! It can malfunction! It can have a steep learning curve, and students’ and teachers’ attitudes toward it can have bring their own pitfalls.
I learned so much this past year when integrating a new digital arts curriculum, and I’d like to share some insights with you today. New or seasoned, brave or tentative, there’s something for everyone!
1. Think about the order in which you teach skills.

In other words, do digital photography first! For some reason, I just got right into design work and teaching the nuts and bolts of image editing software. I probably made this mistake because it’s how I was taught: just get right into the toughest thing- the software. But then I realized all too late the students would be forced to work with unoriginal imagery. Had they done an entire unit on digital photography first instead of towards the end, we would’ve been editing and using original, meaningful imagery. Think about all the skills you want to cover before planning out your curriculum.
2. Start with basic, portable software.
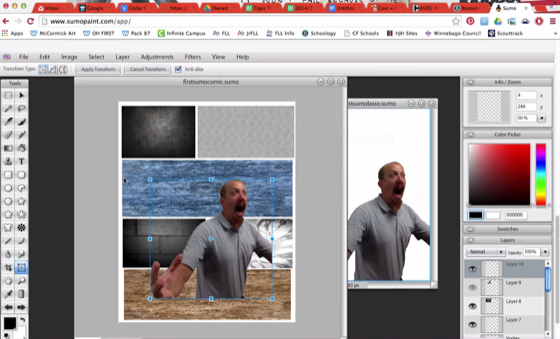
My school is 1-to-1 with Chromebooks. However, I did have access to 23 decrepit Macs that had the newest version of Adobe Photoshop Creative Suite 6 (CS6). What to do? I decided that starting with basic software was the way to go. We used Sumo Paint, a free, web-based graphics program, but there are other options you could choose from such as GIMP or PIXLR. Although this intro project got voted as a “dud” by my students, I would do it again because it allowed them to take their Chromebooks home and work on their skills at their own pace. However, I would make the intro unit only last for one or two projects. I definitely overstayed my welcome in “freeville” and learned the hard way that you often get what you pay for!
While Adobe CS6 is an industry standard for graphic design, having new students use it on day one would be like jumping into a Rolls-Royce while only having a learner’s permit. Starting with some training wheel programs definitely helped. When we transitioned to CS6 and took off the training wheels, all work had to be done in class at a regimented pace, so the time spent slogging through the basic, portable software was well-spent.
3. Keep students away from filters…at least at first.
If you want students to learn about text, color nuance, layers, and the finer points of overall composition, STAY AWAY FROM THE FILTERS TAB IN PHOTOSHOP. If you show students a “cool” yet gimmicky function like filters, expect every swirled rainbow gradient background imaginable. The genie of bad design is a difficult one to put back in the bottle. In my classroom, we call this phenomenon “clown vomit” or “rainbow puke.” If you want students to learn some fundamental technology skills, make sure you know where all the shiny baubles are located and put them away.
4. Hit ’em where they live — GIFs and movies.
I’m a firm believer that if you want your curriculum to resonate with students, you have to hit them where they live. Use the tools and media they enjoy. These days that seems to mean Snapchat, Twitter, and Instagram among others. I feel it’s our obligation to be somewhat fluent with these programs. I know GIF files (constantly looping images) are really popular with Twitter and Tumblr, so I had my students make some. While difficult, making GIF files with Photoshop was rewarding for my students. Plus, the project was a great Photoshop capstone project and transition into cinematography and making original movies with iMovie. The concepts of animation and timeline editing in Photoshop had a good deal of crossover when it came to editing our video creations. For a stellar student video example check out “Killer Trains”.
I’m looking forward to keeping you posted on what’s next for my digital arts curriculum. Next year, I’m expanding with a new advanced class. I’m looking to explore 3D architecture and modeling with Sketchup and Blender, 3D printing, and rudimentary video game design. It’s exciting to have AOE as a platform to share these discoveries with all of you. Stay tuned!
What digital arts programs are offered at your school?
What questions do you have about crafting a digital arts curriculum?
Magazine articles and podcasts are opinions of professional education contributors and do not necessarily represent the position of the Art of Education University (AOEU) or its academic offerings. Contributors use terms in the way they are most often talked about in the scope of their educational experiences.