Are you interested in printmaking but fearful of the mess? Does the thought of managing students as they carve and ink and print stop you dead in your tracks? If so, I am here to help with 5 secrets that will turn printmaking into your favorite art room medium!
1. Plan Ahead
You need to really think through your print-making process. This means that way in advance you should think about the subject matter, prep the supplies, organize the tools, and design a solid clean-up strategy. I suggest “chunking” the lesson into manageable steps. For example, my 2nd grade students create a bug triptych print as a part of their insect unit. I break my lesson down into the following steps:
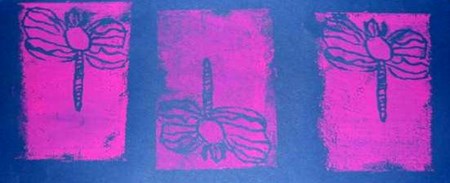
- Day 1 – Fold a 9 x 12 drawing paper into 4ths and draw 4 different bugs in pencil (one in each quadrant). They should be large and detailed, filling the rectangle.
- Day 2 – Finish drawings (if needed), choose one drawing to cut out and tape it to a pre-cut foam printing square. I use Blick’s Inovart Printfoam for Block Printing, which just happens to come in 9 x 12 sheets. These can be cut with a paper cutter: two quick chops and I have my rectangles ready to go, easy-peasy! Trace all lines with a ball-point pen. Remove the paper and re-trace the lines with the pen. Then, write names with sharpie on the back of the foam printing plates.
- Day 3 – Printing!
If students finish one of the daily plans early, great! I still do not let them move on to the next step. There is just too much to prepare for all at once.
2. Demonstrate and Use Checkpoints
Printmaking requires a lot of steps and specific directions. Each day, I begin with a demonstration of the task for the day. This is a great project to demonstrate under a document camera if you have one (or another reason to advocate for a document camera in the art room if you don’t!). I also include step-by-step directions on the board or projection screen, complete with Teacher Checks. This helps me catch students quickly if they are off track and saves valuable time and supplies. A sample PowerPoint slide is included below.

3. Set Up Stations
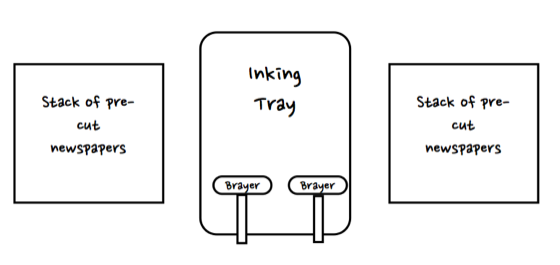
Printmaking doesn’t have to be a free-for-all. It is a highly motivational medium that students typically don’t want to miss out on, so use this fact to your advantage. I set up inking stations and teach students how to take turns, wait in line, and clean up after themselves. Character building at its finest! Just one of the many “extras” we teach in the art room.
My classroom inking stations might look like this (schematic below): 1 inking tray (paper plates or lunch trays also work) and two brayers for each color. For this second grade lesson, I offer 3 colors, so 6 students can be inking at once. Next to each inking station are two piles of pre-cut newspaper (I just slice off the folded edge and viola, individual sheets!). Students bring only their foam plates to the inking station. The actual printing is completed at their desks. Students choose their ink colors and get in line. They wait their turns, ink their plates and carry the plates back to their seats using one sheet of newspaper underneath. I stress the cleanliness of printmaking. You don’t want finger prints on your finished piece!
4. Teach procedures, procedures, procedures!
I cannot stress this one enough. If you have ever taken a printmaking class yourself, you know how precise printmaking can be. If you want to keep your sanity when teaching printmaking, you must have a procedure for each step along the way. It’s equally important to model and teach that procedure thoroughly before starting. For example, I teach students to look for an “orange peel” texture in their ink. If they don’t see an orange peel texture, they need to raise their hand before they ink. I model a print made with an orange peel texture and one without (which, of course, turns out horribly!). I also have students rinse their Styrofoam off between prints. I show them how to rinse their plates with a trickle of water and dry them by placing them under paper towels and pressing down gently. It may sound completely anal, but the results are worth the trouble, I promise.
5. Allow for ample time
Part of the beauty of printmaking comes from stepping back and letting your classroom hum. You aren’t going to knock out this lesson in one day and that is OK! Give your students the opportunity to explore the materials and learn the techniques. I would encourage you to try to take this lesson even deeper if possible. The Common Core is all about creating curriculum that is “a mile deep” and printmaking can be a great fit.
Here are a few extension ideas:
- Print white ink on black paper and add colored pencil after it is dry.
- Use analogous ink colors in the inking tray.
- Overprint with a darker color after adding additional details to the foam plate.
- Give finished prints an authentic feel, adding artist names and series numbers.
- Use sharpies to add details to the foam plate after you are finished printing.
- Destroy the styrofoam pieces so the prints can’t be reproduced!
What are you biggest fears about print-making in the art room?
Do you have any successful secrets to share?
Magazine articles and podcasts are opinions of professional education contributors and do not necessarily represent the position of the Art of Education University (AOEU) or its academic offerings. Contributors use terms in the way they are most often talked about in the scope of their educational experiences.