I enjoy fiber arts personally. My grandmother taught me how to knit and crochet as a small girl and the love for creating little tokens of love has stuck with me all these years, however, this isn’t my favorite subject to teach. I struggled for years to find a balance between allowing students to have a fiber “experience” and creating something that was actually worth spending the time working on. I felt knitting and loom work would be a good fit, and I wanted to share my passion with the classroom, but I wasn’t sure how to acquire the tools that I needed (on my ever dwindling budget) so that each student could have a personal experience knitting. Here is what I came up with:
1. Finger-Knitting
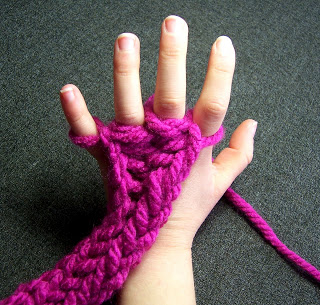
This is a great way to get students hooked on knitting with absolutely no tools required, except yarn. There are many variations, but this tutorial on finger-knitting is very simple and concise. The end result is a thin, knitted scarf that can be tied off or coiled and sewn together. Disclaimer: you will most likely receive finger-knitted gifts from students and classroom teachers will too (you might want to give them a heads up). Just wrap them around your neck or throw them on like a belt and make a fashion statement! The image below, along with another great tutorial, can be found at Little Bird SOS.
2. Knitting with Straws
Once students grasp finger-knitting, they might be ready to try using a straw loom. This project uses yarn, tape and drinking straws to make small beautiful pieces, such as a bracelet or bookmark. There is some set up involved, mainly cutting weft lengths and threading yarn through the straws, so it might work best for older elementary or middle school students. This video tutorial provides a nice step-by-step process. Money saving tip: check with your local fast food venders for straw donations. I like Sonic’s straws, they are nice and wide.
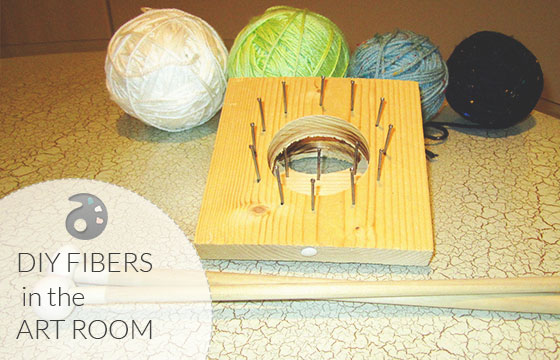
3. Circle Looms
The nice thing about this project (as opposed to finger-knitting) is that students can find a stopping point and then continue their work the next class period or until it is completed. You can purchase circle looms at most hobby stores, but I wanted each student to be able to use one, so I decided to make them myself. It all started at the hardware store where I bought a 1″ x 6″ x 8′ pine board. I used a table saw to cut it into 5.5″ x 5.5″ squares (A typical 1″ x 6″ board is really only 5.5″ wide, so I only had to cut the length). If you don’t have access to a table saw check with the lumber department, some will cut the wood for you. Or, maybe your shop teacher or school maintenance team could help?
Next, I used a 2 1/2-inch hole saw attachment (these fit on to most hand-held drills) to drill holes into the center of each board. I had to use clamps to hold each board while I was cutting the hole because the pieces were relatively small.
Finally, I hammered nails into the board around the hole. You want to make sure that you have an even number of nails in order for the loom to work properly. I hammered 12 nails around the circle just like a clock face. Quick tip: make sure to use nails with small heads so that the yarn can be easily manipulated over the nail.
A push pin, inserted into the side of the board works to hold the initial slip knot. That’s it! It is easy to create a class set of circle looms in a couple hours on a small budget and with a little elbow grease.

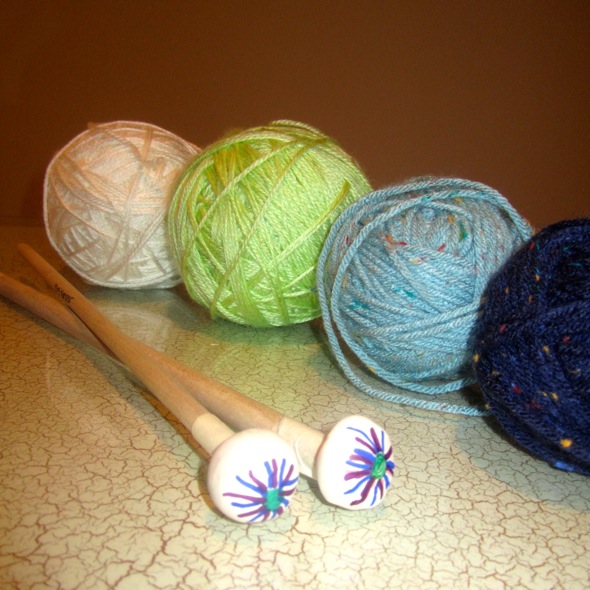
4. DIY Wooden Knitting Needles
When you are ready to make the jump from loom knitting to knitting with needles, I strongly recommend having students create their own wooden needles. Students enjoy the process of making the knitting needles almost as much as learning to knit and it is simple, easy and inexpensive. I purchased wooden dowels from my local hardware store and cut them into the desired length (around 12-16 inches). Next, we stuck one end of each dowel length into an old metal pencil sharpener (the wood is too hard for most electric sharpeners, so I don’t recommend you try that) and gave them a basic pointed shape. Next students used sand paper to smooth the tip and the length of the dowel. Any rough areas will cause the yarn to snag, so this is a very important step. Finally students used model magic to design small beads that fit at the flat end of the dowel and help hold on the yarn. These beads were then decorated and glued to the end of the knitting needles to make each pair easily identifiable and as unique as the owner. Quick tip: If you choose to use ceramic clay to make the end beads, make sure you make the connection large enough to allow for shrinkage.
Tell us about your fiber -arts lessons in the art room?
Do you have any inexpensive weaving tips to share?
Magazine articles and podcasts are opinions of professional education contributors and do not necessarily represent the position of the Art of Education University (AOEU) or its academic offerings. Contributors use terms in the way they are most often talked about in the scope of their educational experiences.